Run and compare multiple models
This example is all about running code in AskAnna. It shows how you can train and evaluate multiple models using AskAnna. We based this example on the article Quickly Compare Multiple Models written by data scientist Cole Brendel.
As mentioned in the article, the main idea behind comparing models is finding the model architecture that best fits your data. In this demo you will train multiple models and evaluate the performance using AskAnna. Additionally we demonstrate how you track what you do. It's like version control for data science.
With this example you will learn to:
- Quickly compare multiple models
- Create a project in AskAnna using a project template
- Configure tracking metrics and variables
- Run both Python scripts and Jupyter Notebooks
- Use the web interface to review the run
If you want to run the models yourself, you need:
- an AskAnna account (you can sign up for free)
- Python > 3.7
- install AskAnna CLI and login
First, we will show the quick tour how to run this example project. Next, we will explain step by step what we did.
Quick tour
In your terminal, run the following command to start a new project using this demo project template:
askanna create --template https://gitlab.com/askanna/demo/demo-multiple-models.git --push
You only have to add a project name. We named it Quickly compare multiple models. The description is optional. If you confirm, the AskAnna CLI will set up a new project.
Now you can run the job to compare multiple models:
askanna run compare-multiple-models
Go to https://beta.askanna.eu and select the project you just created. Or open the project URL that was mentioned in the AskAnna CLI when you created the project.
On the project page, open the tab JOBS and:
- click on of the job
compare-multiple-models - click on the run
- on the run page, click on the tab
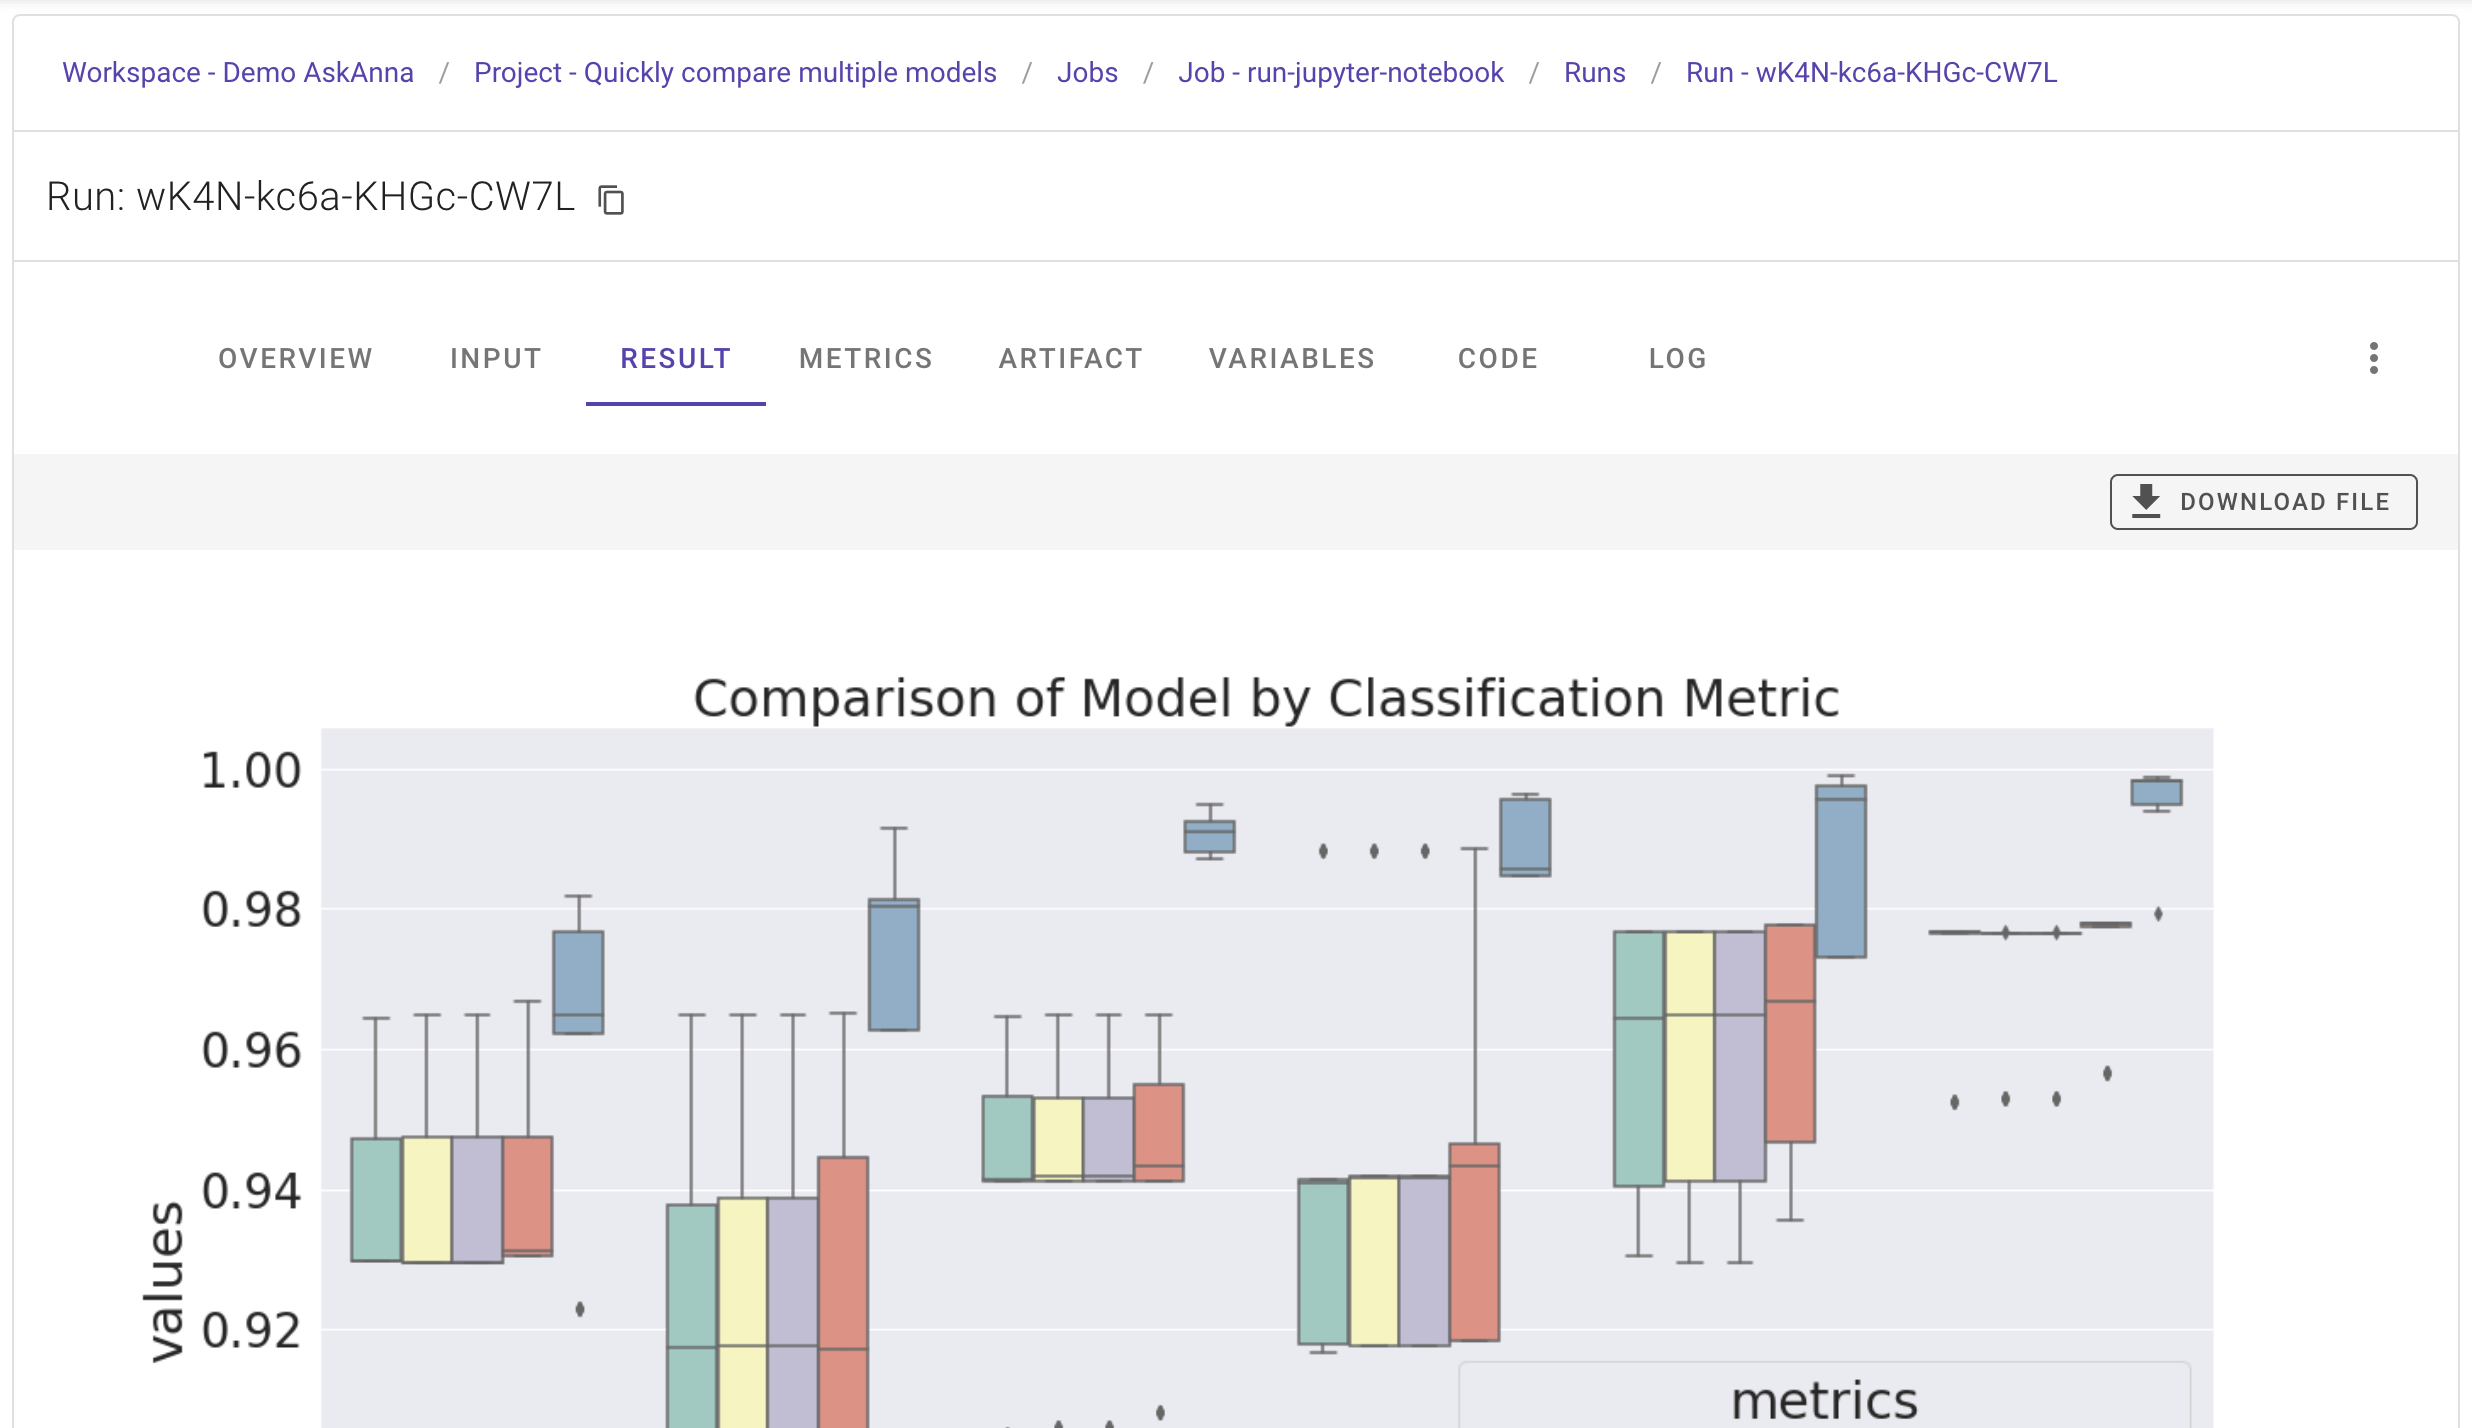
RESULT
If the run finished, in the RESULT tab you see an image with a summary of the models.
The above is a really short version of how you can run jobs in AskAnna to compare multiple models. Next, we will deep dive into the different steps to share more background about what just happened.
What happened in the quick tour?
Create the "Quickly compare different models" project
In your terminal, you run the command:
askanna create --template https://gitlab.com/askanna/demo/demo-multiple-models.git --push
After you confirmed that you want to create the project, this is what happened:
- a new project in AskAnna was created
- a new local directory for the project was created based on the project name
- the project files were copied from the project template in the local directory
- updated the
askanna.ymlconfig with the newly created project URL - pushed a version of the project files to AskAnna
For this example, we used one of our demo project templates to quickly set up the project. In the create command, we referred to the template's location via the argument --template.
With the argument --push we gave the instructions that after creating the project, we want to push a version of the project to AskAnna. If you first want to modify the project locally before pushing, then remove --push from the above command.
Read more about creating projects and project templates
Run the jobs
With this example project you can run two jobs:
- compare-multiple-models (used in the quick tour)
- run-jupyter-notebook
You can use the AskAnna CLI or the web interface to run the jobs. In the quick tour we used the CLI to run the job. In your terminal, you can run the next commands to run both jobs:
askanna run compare-multiple-models
askanna run run-jupyter-notebook
In the web interface on the project page, you can click on the tab JOBS. Then:
- click on a job to open the job page
- on the job page, scroll down to the section
Running the job - start a run with a simple click on the button
Run this job
Review the run
On the job page, you find a tab RUNS listing the job runs. When you click on a run, the run page opens. Here you find a summary of the run and several tabs with more metadata.
Result
If you click the RESULT tab, you should see an image containing the performance benchmarks of the different models.
Artifact
On the tab ARTIFACT you find the content of the output directory. If you run the run-jupyter-notebook-job, here you can find two images and a Jupyter Notebook:
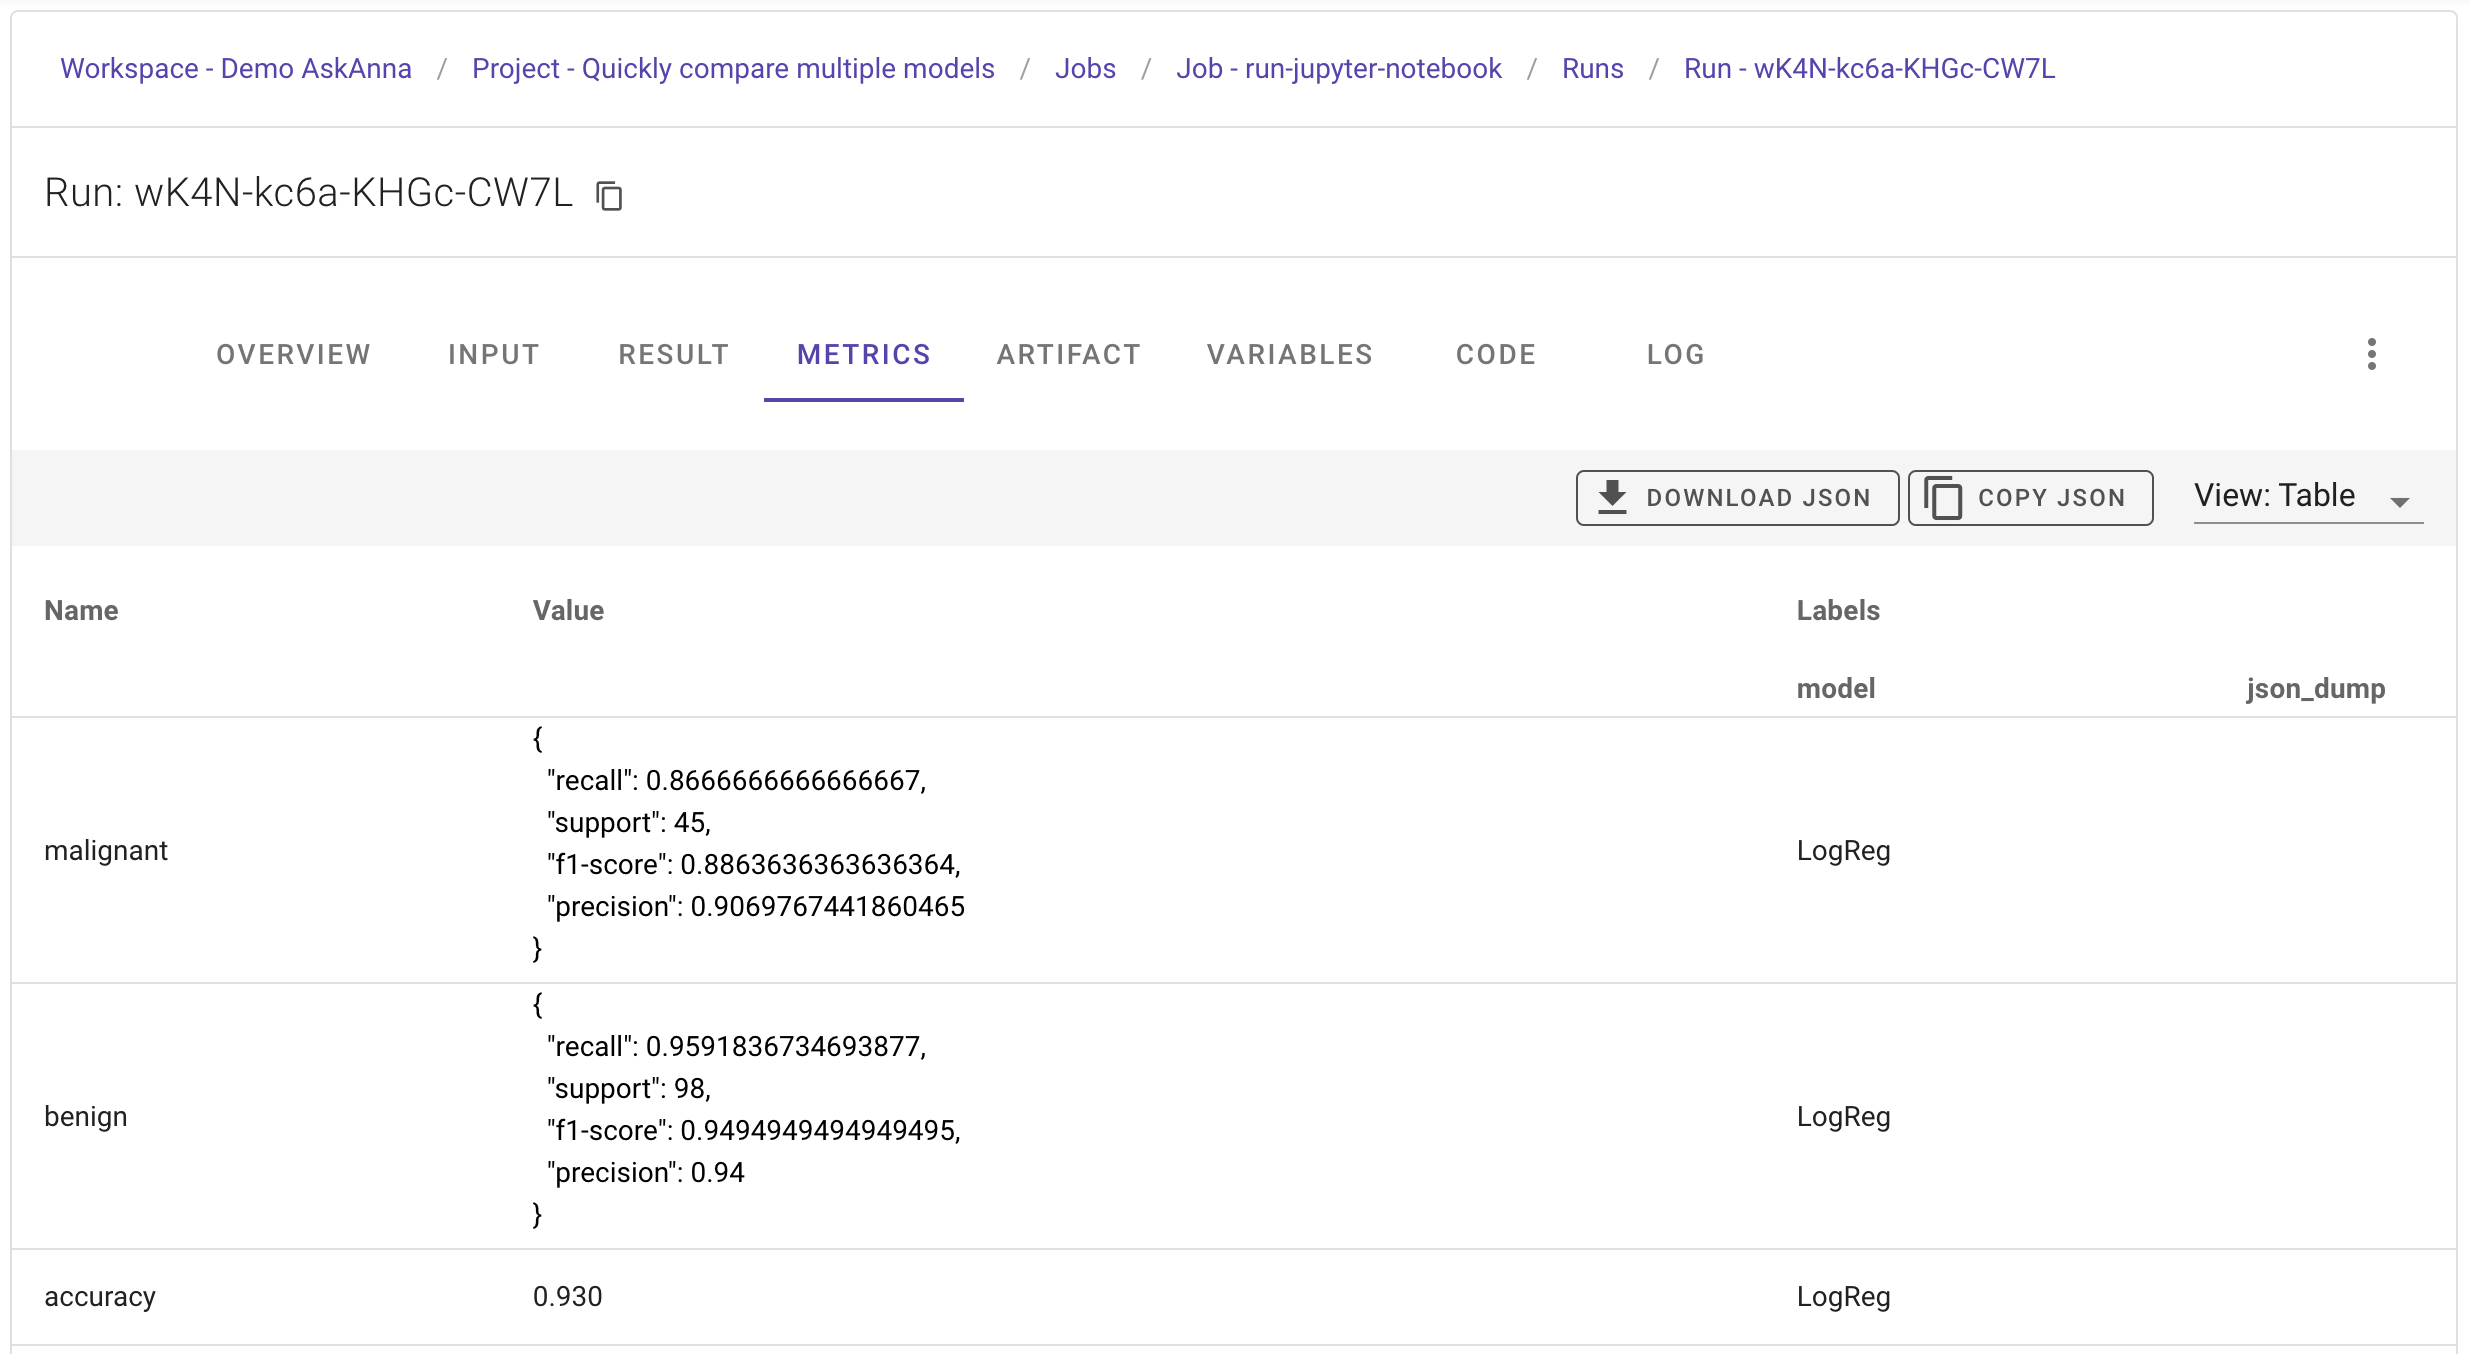
Metrics & Variables
The tab METRICS shows the metrics tracked. The same for the tab VARIABLES.
About the project code
In the code directory, you see four files and one directory. The directory output will be used to save the output of the script. The project files are:
demo-multiple-models.py
Python script that uses the breast cancer dataset from scikit-learn. The script runs multiple models and compares the performance & execution time. For more background information about what happens in the script, please read the article "Quickly Compare Multiple Models".
To track variables and metrics, we added the following to the script. First, we imported the tracking modules for AskAnna in line 8:
from askanna import track_metrics, track_metric, track_variable
The script set some specific scorings to calculate. We track these settings as variables of the run. Imagine you try different scorings. With tracking this variable, you can always filter on runs that used a specific scoring. For the full configuration, see line 37 till 41 in the script. A code snippet for the scoring variable:
scoring = [
    "accuracy",
    "precision_weighted",
    "recall_weighted",
    "f1_weighted",
    "roc_auc"
]
track_variable(name="scoring", value=scoring)
For each model, the script calculates a classification report. We track this report as a metric. To trace back which model was used, we also add a label with the model name to the tracked metric:
model_report = classification_report(y_test, y_pred,
                                     target_names=target_names,
                                     output_dict=True
                                    )
track_metrics(model_report, label={"model": name})
At the end of the script (line 93 and 99), we save the generated plots in the output directory:
plt.savefig('output/benchmark_models_performance.png')
As you can see, we added just some additional lines of code to the example described in the article. The extra lines of code make it possible to track information regarding the run. Of course, you don't have to do this, but it can be helpful to trace back what happened in a run. Or if you want to experiment with settings and later compare the settings used per run.
demo-multiple-models.ipynb
Functionally it does exactly the same as demo-multiple-models.py, but then in a Jupyter Notebook. In AskAnna you can view Jupyter Notebooks, and also run them. Run the job run-jupyter-notebook to see an example.
askanna.yml
This is the configuration file for AskAnna. Here we define the jobs. In the job definition, we describe what to run and which output to save. With the push-target, we refer to the project in AskAnna, so you can push code and start jobs via your terminal.
In the askanna.yml we specified two jobs:
- compare-multiple-models: to run the Python code that runs and compares multiple models
- run-jupyter-notebook: to run the Jupyter Notebook that also runs and compares multiple models...but then in a Notebook
The config of these jobs is similar. Let's use compare-multiple-models:
compare-multiple-models:
  job:
    - pip install -r requirements.txt
    - python demo-multiple-models.py
  output:
    result: output/benchmark_models_performance.png
    artifact:
      - output/
The job contains the commands you want to run. To run the code, we only need to install the Python requirements and run the Python code. In the output we specify the result of the run, and the artifact we want to save.
The Python script writes all relevant data to the output directory. We save this output directory as the artifact of the run. For this job, we see the plot that benchmark the models performance as the main result. So, we save this image as result.
Read more about creating jobs
requirements.txt
The Python packages that are needed to run the project. If you install the packages in a virtual environment, you can also run the script locally yourself.
Summary
With this example, you have seen how you can use a project template to set up a project in AskAnna. In this project two jobs are configured. In these jobs you read data, run multiple models and compare the performance of these models.
The output images of the Python script were saved, and you have seen how you can review the result in AskAnna. Also, you have seen how to track variables & metrics, and save output of the run.
We hope that you get an idea about the power of AskAnna via this demo and how this platform can help you and your team collaborate on data science projects. If you have questions or need help starting your first project, don't hesitate to contact us. We love to support you!